
This is in working-draft format at the moment; more to come.
Challenges
- The OEM Miata instrument cluster is responsible for interpreting the speedometer sensor, and then transmitting the signal to the ECU; a replacement VR sensor conditioner was required
- The OEM fuel level gauge would need to be replaced, which required an appropriate signal for the Megasquirt to process and display
- Finding a large enough display to replace the OEM cluster
Hardware
Power Supply
Mausberry makes an intelligent power supply which communicates with the Raspberry Pi and can initiate a clean shutdown after the ignition is shut off.

Display
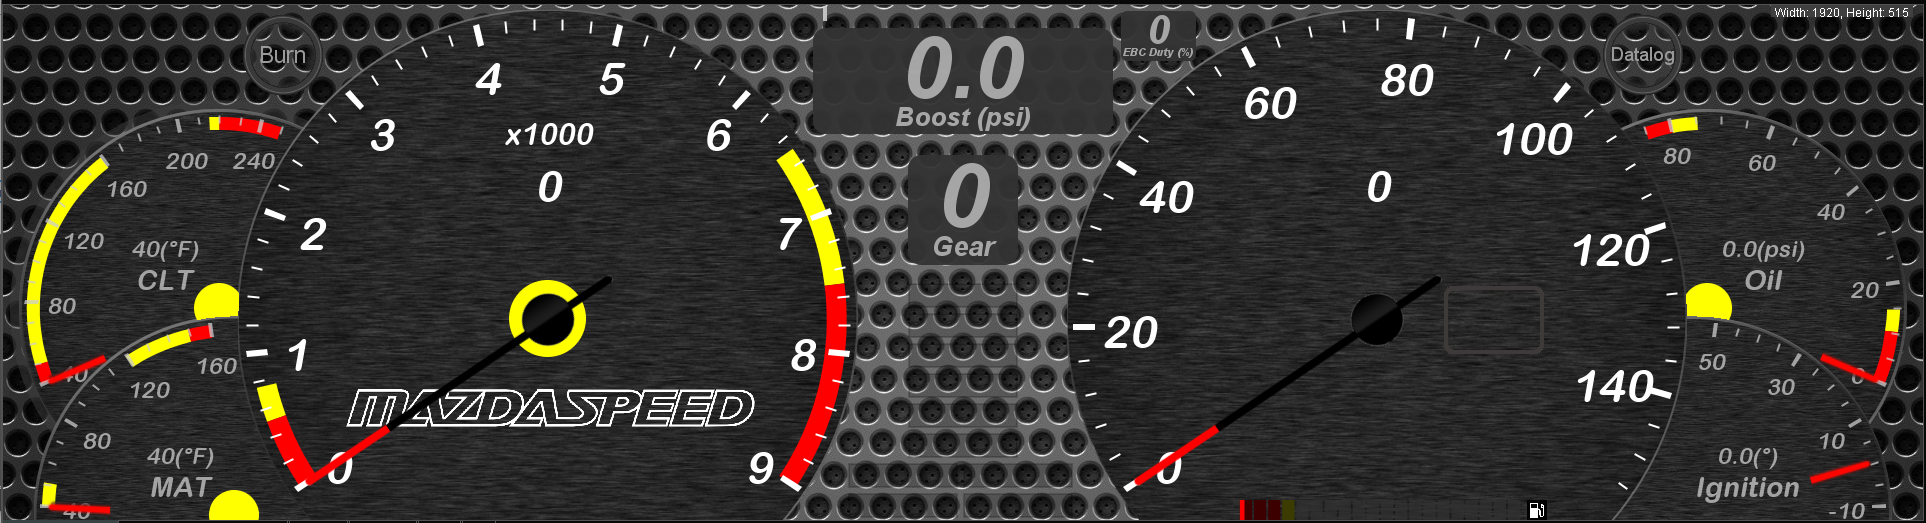
I picked the VSDISPLAY 12.6" 1920X515 LCD screen with HDMI inputs.


I should note that I originally wanted to completely mimic the OEM Miata instrument cluster, and below are pics of what I accomplished in that vein. That said, I've since abandoned the idea for a cleaner (and I think more useful) mounting style.


Final mounting style is more plain:

Speedometer Input to Megasquirt
A VR conditioner was needed to adapt the stock Miata speedo sensor to Megasquirt. I soldered on some screw terminals to make things easier.

Fuel Tank Level Input to Megasquirt
I have an aftermarket fuel tank, but the principle remains the same for OEM fuel senders. The +5Vdc Reference from Megasquirt needs to be brought into a voltage divider, which in this case I used a 27 Ohm resistor I had on hand plus the 33 Ohm to 240 Ohm aftermarket fuel sender.

Pi OS and configuration
The base OS we're using is DietPi as lightweight, fairly devoid of features, and (most importantly) quick booting.
OS image
Alex Bartonek has cut through a lot of the initial work required and built an image that got me most of the way to where I wanted to be.
- Website: https://www.bartonekdragracing.com/encyclopedia/pidash-knowledge-base/
- Public discussion: https://www.facebook.com/PiDashByAB
As with all open-source projects, it's an eternal work in progress. At the time of writing, there are a few steps to follow to complete the OS install using Alex's image.
- Download the base image - 05/02/2020 Version v1.5.3 (link)
- Burn image to SD card
- Before removing the SD card, edit the config.txt to match the display settings
- Update to 08/28/2020 Version v1.5.3.1 (source)
wget --no-check-certificate --user-agent=Mozilla https://www.bartonekdragracing.com/pidashupdates/update_pidash.sh
chmod +x update_pidash.sh
./update_pidash.sh - Update to latest version of the AB Updater (source)
wget --no-check-certificate --user-agent=Mozilla https://www.bartonekdragracing.com/pidashupdates/pidash_updater.run
chmod +x pidash_updater.run
./pidash_updater.sh - #profit
Linux Display Settings
Official documentation: link
If you haven't already done so, edit the matching /boot/config.txt "hdmi_cvt" configuration line to the following so the resolution is set correctly to 1920 x 515:
hdmi_cvt = 1920 515 60 6 0 0 0
Mausberry Service Configuration
Their own setup documentation can be found here. The AB Updater (above) has the ability to set this up for you as well, but it didn't work for me and I needed to install this manually.
- wget http://files.mausberrycircuits.com/carsetupArch.sh
- chmod +x carsetupArch.sh
- ./carsetupArch.sh
- reboot
I've customized the /etc/switch.sh service to better suit my needs; I'll provide that code here later.
Interfacing
Mini wireless keyboard/trackpad combo, connected via USB dongle.

TunerStudio Configuration
License
You'll need a licensed copy of TunerStudio (see Parts List) to design your own dashboard, so bear that in mind if you don't already have a license.

Options, Preferences
You're going to want to enable the following settings:
- Load Last Project on Startup
- Make Dashboards Full Screen

Parts List
- MS3Pro EVO (link) or your choice of Megasquirt ECU
- TunerStudio license, either MS or MS Ultra (link)
- Mausberry 4A power supply switch (link) for display + Raspberry Pi
- Raspberry Pi 4b 8GB (link) - note: the 2GB or 4GB are sufficient too
- Rii Mini Wireless Keyboard X1 (link) (link)
- VSDISPLAY 12.6" NV126B5M-N41 12.6" 1920X515 LCD screen (link)
- CableCreation short USB-C cable 5" (link)
- Dual VR Conditioner Board V2.1 (link)
- Terminal block, for VR conditioner (link)